Creating a project
- Navigate to the relevant folder. If one doesn’t exist for the state that your flight(s) is/are located in, then create one.
- Click on the create project icon
 .
. - Navigate to the general location of your project and click on the ‘Create Project Here’ icon.
-
Name your project and select the ‘Standard’ model.
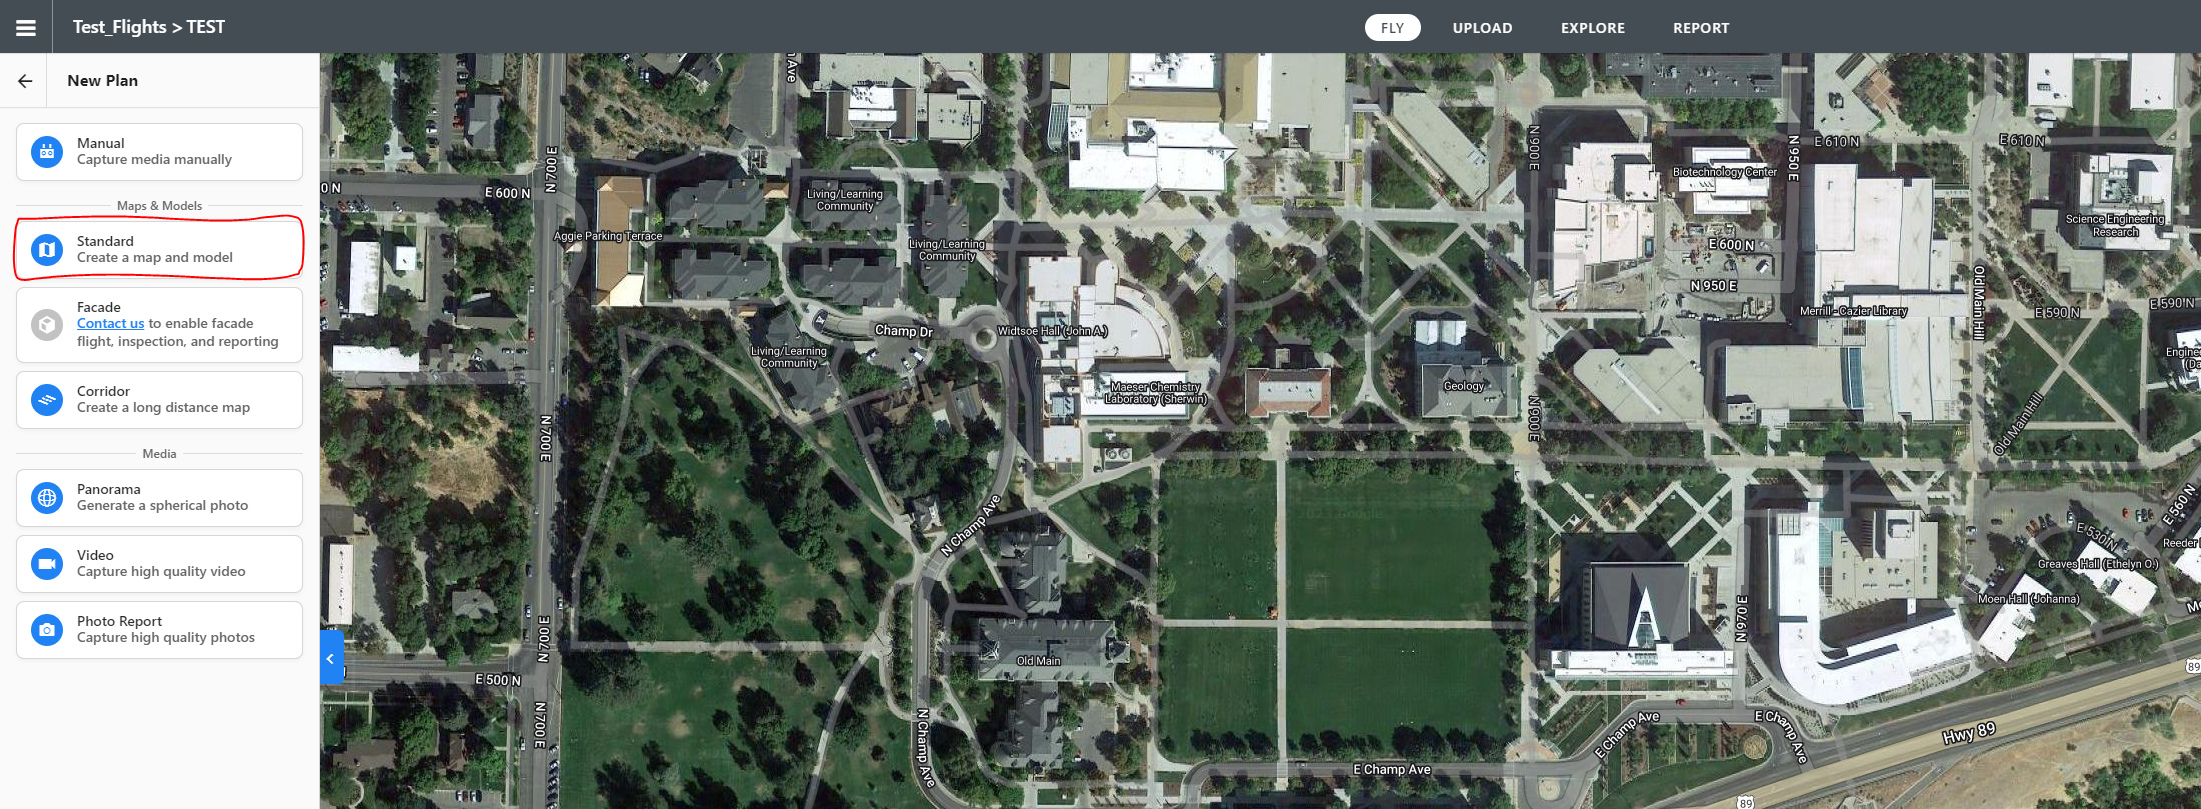
- This is where you will set up your autonomous flight(s).
- Rename your flight by clicking on the three dots next to Map Plan.
-
To add multiple flights to a project, simply click on the blue plus sign
 located next the Map Plan name. You can then access each flight by using the drop down.
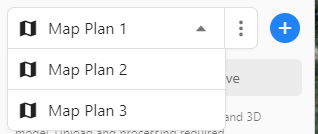
Setting up autonomous flights
-
Delineate your valley bottom(s) for the extents of desired flights. Note: these shapefiles need to have a CRS of WGS84 (EPSG:4326)
-
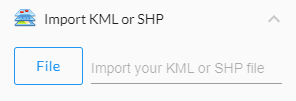
Import your valley bottom shapefile(s) to the relevant DroneDeploy project using the Import KML or SHP app.
-
Adjust the flight plan settings as necessary.
- Altitude
- 3D enhancement
- Flight direction
- Obstacle avoidance
Make flight plans available offline
- On the iPad mini, open up DroneDeploy.
- The interface is the same as on the web browser.
- While connected to the internet, navigate to your project.
- The projects you created on the web browser should sync automatically.
- Select the plan you want to make available offline.
- Turn off Automatic Settings
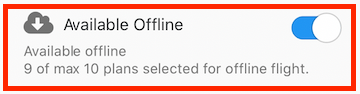
- Select the toggle for ‘Make Available Offline’
- Allow plan to fully sync before closing the app.
- Before heading into the field, make sure that your plan is downloaded for offline use.
- Turn on airplane mode
- Close the app
- Re-open the app and ensure its available and displaying properly.
- You can also restart the iPad and repeat steps above.
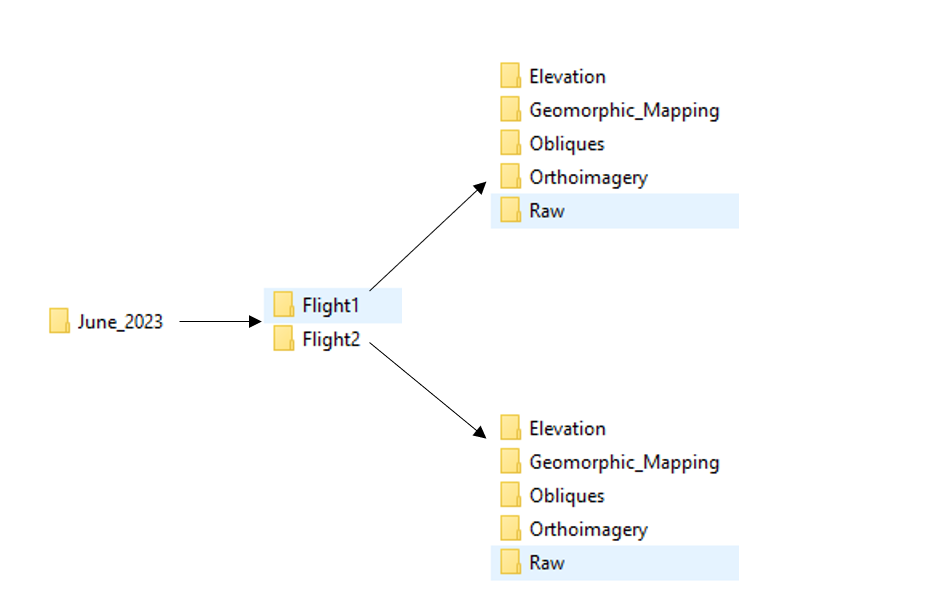
Uploading imagery to Box and DroneDeploy (Post-Flights)
- Create a folder on Box to house all of your drone data.
- This folder should be named after the month and year that the imagery was captured (i.e. June_2023)
- Within the ‘Month_Year’ folder you should create separate folders for each flight that was captured in the field.
- Within those folders you should create the following folders:
- Elevation: houses the elevation models from DroneDeploy
- Geomorphic\_Mapping: houses the mapping that is done later on
- Obliques: houses the oblique imagery that was captured in the field
- Orthoimagery: houses the high-res orthoimage from DroneDeploy
- Raw: _houses the individual images from the field prior to mosaicking
- Delete ground photos.
- Prior to takeoff, the drone always takes a photo of the ground. Go through and delete these photos from the SD card.
- For each flight, move the oblique photos from the SD into the relevant ‘Oblique’ folders.
- For each flight, move the raw photos from the SD into the relevant ‘Raw’ folders.
-
In DroneDeploy, navigate to the relevant project and press the ‘Upload’ tab at the top of the screen.

- Drag and drop your photos from the ‘Raw’ folder into the upload pane.
- After the upload is complete, the images need to be processed by DroneDeploy before the products will be available for export. This can take a few hours.
Exporting DroneDeploy products
-
Once the processing has been completed, you can access the available data by clicking the ‘Explore’ tab and navigating to the date that the images were collected.

-
From there, click the ‘Export’ icon at the bottom left of the screen

-
Select the product(s) you want to export. Note: the three products we will almost always export are the GeoTIFF Mapp (which is the orthoimage), the DTM and the Elevation Raster.
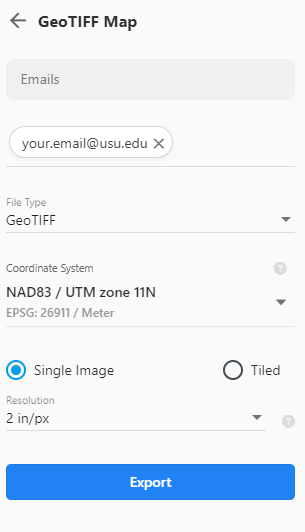
- Exporting the Orthoimagery.
- Select the GeoTIFF option.
- Change the email address from Wally’s email to yours.
- Make sure the file type is GeoTIFF.
- Change the CRS NAD83 / UTM Zone (blank)
- Change the resolution to 2 in/px.
- Click ‘Export’.
- Before you Export the DTM and Elevation models, they need to be calibrated
- While in the Explore tab, click the Elevation dropdown
- Click ‘Calibrate elevation’
- Open Google Earth Pro and navigate to the site
- Find a location that overlaps with your orthoimage and take note of the elevation in feet
- In DroneDeploy, drop the calibration marker at that point and enter the elevation
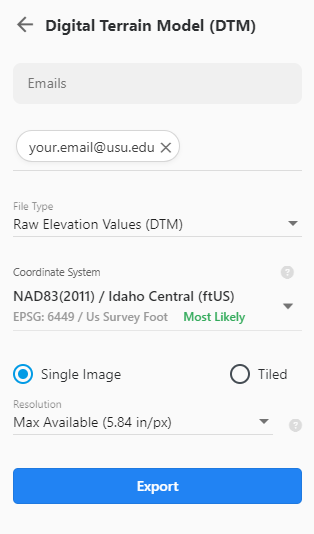
- Exporting the DTM
- Select the DTM option
- Change the email address to your email
- Make sure file type is Raw Elevation Values (DTM)
- Change the CRS NAD83 / UTM Zone (blank)
- Click ‘Export’
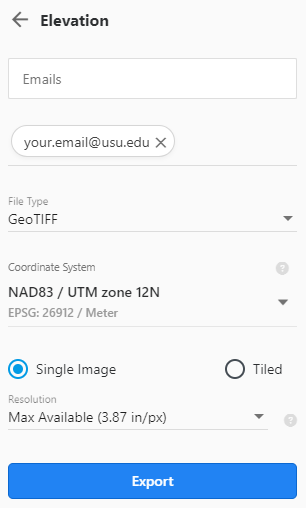
- Exporting the Elevation Model
- Select the Elevation option
- Change the email address to your email
- Change the CRS to NAD83 / UTM Zone (blank)
- Click ‘Export’
- Once you select ‘Export’ the products will begin processing. Once the processing is complete you will receive an email from drone deploy with a link to download the product. Save each product into their designated folders on Box
- Orthoimage goes to the Orthoimagery folder
- DTM goes to the Elevation folder
Other Resources
DroneDeploys documentation on flight planning
https://help.dronedeploy.com/hc/en-us/articles/1500004964302-Mobile-App-Flight-Planning
DroneDeploys documentation on exporting data
https://help.dronedeploy.com/hc/en-us/articles/1500004964642-Exporting-Your-Data